Monday, April 30, 2012

How to make polymer clay ice-cream scoop~

Hi there~!
This blog post PinkPandaCraftShop is going to show you how to make polymer clay ice-cream scoop :)

First, let's get the tools that you'll need:
  • measuring spoon (It's going to be your scoop~ you can get any size you would like to make)
  • toothpicks (I like to use 3 and tape them together, as shown in the picture)
  • brush (Paint brush, toothbrush, any kind that with stiff bristles~)
  • polymer clay of course :)

Ok, first step, take your measuring spoon and polymer clay with you.


Than you can pull your clay and start working on the "texture".


Keep rubbing until you get this texture result~


Now you need to have your measuring spoon and put the textured side in it.


Push it down, get this half sphere shape.


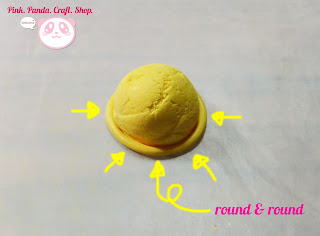
Then use the edge of the measuring spoon to help cutting the excess around the ice-cream scoop.


Next step, you can take a little amount of clay from the excess. Roll a long clay worm and put it around the ice-cream scoop.


Have your brush ready and start tapping on top to give some extra texture.


Now you need your toothpicks.
Start pressing marks on the edge around the scoop.


When you have the marks all around, then start using the toothpicks to push the edge towards the scoop.


Now you're done~!


I've made a whole bunch~ Will start working on my "Decoden"!
You can also mix some color in it to have different "Flavor"~ Or put some "chocolate chips" clay in :)


I tried to make some polymer clay banana canes as well, and cut them in pieces~


Maybe it will be the next tutorial~? lol

Thank you for stopping by our blog and please stay tuned for more!

We have our Etsy Shop here:

Please check out our facebook fan page:

and please follow us on Pinterest and Twitter:
http://pinterest.com/ppcraftshop/


We really appreciate your support!

Tuesday, April 17, 2012

How to make polymer clay marshmallow pop~

Hello~


This post is going to talk about "How to make polymer clay marshmallow pop"~


Things you will need:
- Q-tip (Please get the kind with the paper finished stick instead of the plastic one)
- Polymer clay (2-3 different colors)
- Bakeable adhesive
- Scissors
- Craft knife


1. First of all you will have your Q-tip ready~


2. Then use a scissors to cut the cotton ends off~


3. Now you have a stick for the marshmallow pop~


4. Have your polymer clay ready~ (Color of your choices)


5. Then roll them into string forms like so~ (Keep them kinda thick and flatten both ends)


6. Have your bakeable adhesive ready and put it on the Q-tip stick. About 1/4 of the stick's length. (Please remember to get the "bakeable" adhesive because this is safe be in the oven)


7. Now you line up 2 of your colors together. Then put the stick with adhesive on top of it, like so~


8. Stack the 3rd color of polymer clay string on top~ It'll form a triangular shape. (As seen in the picture)


9. This is going to be a little bit tricky. You'll need to pick up the whole marshallow. Grab the both ends of the clay marshmallow, then start twisting them all together slowly. (As seen in the picture)


10. Cut off the excess (To the length that you wish it will be~) Then re-shape the end you just cut if necessary.


11. Ta-da! Your polymer clay marshmallow pop is ready to be baked and be a finished product!


Hope you like this tutorial :)

We have our Etsy Shop here:

Please check out our facebook fan page:

and please follow us on Pinterest and Twitter:
http://pinterest.com/ppcraftshop/


We really appreciate your support! Please come back for more :)

Sunday, April 8, 2012

Polymer clay charms~

Hello Hello~

Happy Easter everyone :)

We are glad that we just got a message from a buyer on Etsy~ She is interested in our polymer clay charms. She visited our blog and saw our pictures, so I figured it would be easier to share some more pictures with her here :)
(Thank you for visiting us Grace~)

Here's 2 of the charms that our buyer is interested in~

This one has a light gold color eye pin:
(It looks kinda like silver though)

Size: 3.5cm wide & 3cm tall
0.8cm thick


This one has a silver color eye pin:
But there's a problem at the back though....
Size: 3.5cm wide & 3.3cm tall
1.2cm thick


The paint that I tried on this one was not good enough. I have this sat on the table and the paint at the back got flatten.... T^T (Marked on the picture)
After this I haven't used this paint on the back of any charm anymore....


Here's some other ones we would like to share :)


Getting the charms from us can show your own creativity as well~ You can use them in anyway you want :) We can do custom order so we can adjust the right sizes and colors to our customers~

If you are interested as well, please contact us:


Or you can leave a comment here it will work too :)

Hope you all like it~


Blog Template by Delicious Design Studio